Introduction
Whoever is learning React and wants to build a project with React. There are a variety of blogs and articles to guide a such projects for developers. I do go through those articles but one kind of project is always missing in them. The missing projects are the music player and video player. Both of the projects will give you the opportunity to handle audio and video. You will learn many things such as handling audio for playing and pausing audio.
Today, we are going to build a music player in React. We will look into the following topics:
- Setting up the environment
- Playing/Pausing audio
- Handling time of audio(In term of current time and complete duration of audio)
- Adding a range slider for the timeline of audio
After completing the project, our music player will look like this.
GIF

If this excites you then let’s get started.
Prerequisite and Setting up the Environment
I assume that you have knowledge about the following technologies as prerequisite:
- JavaScript
- HTML/CSS
- Basic React
The environment setup is easy. You should have node.js pre-installed for running the node related command in the terminal.
Navigate to the directory in which you want to create the project. Now, run the terminal and enter the below command to install react project.
npx create-react-app react-music-player
Enter fullscreen mode Exit fullscreen mode
Remove all the boilerplate and unnecessary code. We are now good to go.
Dependencies
We need to install the following libraries to our project:
- use-sound: This will handle the audio file. It will load, play, and pause the audio along with other features.
Install with the below command:
npm i use-sound
Enter fullscreen mode Exit fullscreen mode
- react-icons: For adding icons of play, pause, next and previous into our player.
Install it with the below command:
npm i react-icons
Enter fullscreen mode Exit fullscreen mode
Player.js
Create a component directory in the src folder. Inside that create a component
with the name Player.js. This component will be our music player.
Imports
As per the library to import in the file. You can look at it here:
import { useEffect, useState } from "react";
import useSound from "use-sound"; // for handling the sound
import qala from "../assets/qala.mp3"; // importing the music
import { AiFillPlayCircle, AiFillPauseCircle } from "react-icons/ai"; // icons for play and pause
import { BiSkipNext, BiSkipPrevious } from "react-icons/bi"; // icons for next and previous track
import { IconContext } from "react-icons"; // for customazing the icons
Enter fullscreen mode Exit fullscreen mode
You can look into comments for the explanation of the imports.
Playing and Pausing the audio
Let’s implement the mandatory feature of the player which is playing and pausing the audio.
At the top, we have a isPlaying state for storing the current status of the player. This
will be helpful in conditional rendering the play/pause icon according the status of the player.
const [isPlaying, setIsPlaying] = useState(false);
Enter fullscreen mode Exit fullscreen mode
We need to initialize the useSound with audio. It will return the play, pause, duration, and
sound method.
const [play, { pause, duration, sound }] = useSound(qala);
Enter fullscreen mode Exit fullscreen mode
play and pause is for playing and pausing the audio. duration is
for the length of the track in milliseconds. sound will provide us with the howler.js method for the
sound.
Create a function for handling the play and pause buttons. Here is the code for it.
  const playingButton = () => {
    if (isPlaying) {
      pause(); // this will pause the audio
      setIsPlaying(false);
    } else {
      play(); // this will play the audio
      setIsPlaying(true);
    }
  };
Enter fullscreen mode Exit fullscreen mode
Now, it’s time to add the UI component of the player into the return. Here is the code for
it.
  return (
    <div className="component">
      <h2>Playing Now</h2>
      <img
        className="musicCover"
        src="https://picsum.photos/200/200"
      />
      <div>
        <h3 className="title">Rubaiyyan</h3>
        <p className="subTitle">Qala</p>
      </div>
      <div>
        <button className="playButton">
          <IconContext.Provider value={{ size: "3em", color: "#27AE60" }}>
            <BiSkipPrevious />
          </IconContext.Provider>
        </button>
        {!isPlaying ? (
          <button className="playButton" onClick={playingButton}>
            <IconContext.Provider value={{ size: "3em", color: "#27AE60" }}>
              <AiFillPlayCircle />
            </IconContext.Provider>
          </button>
        ) : (
          <button className="playButton" onClick={playingButton}>
            <IconContext.Provider value={{ size: "3em", color: "#27AE60" }}>
              <AiFillPauseCircle />
            </IconContext.Provider>
          </button>
        )}
        <button className="playButton">
          <IconContext.Provider value={{ size: "3em", color: "#27AE60" }}>
            <BiSkipNext />
          </IconContext.Provider>
        </button>
      </div>
    </div>
  );
Enter fullscreen mode Exit fullscreen mode
For the cover image, I have used the Loren Picsum for generating a random image.
You can look here for the CSS of the file:
body {
  background-color: #e5e5e5;
}

.App {
  font-family: sans-serif;
  text-align: center;
}

.component {
  background-color: white;
  width: 25%;
  max-width: 600px;
  margin: 1em auto;
  padding-bottom: 2em;
  border: 0.1px solid black;
  border-radius: 10px;
}

.musicCover {
  border-radius: 10%;
}

.playButton {
  background: none;
  border: none;
  align-items: center;
  justify-content: center;
}

.subTitle {
  margin-top: -1em;
  color: #4f4f4f;
}

.time {
  margin: 0 auto;
  width: 80%;
  display: flex;
  justify-content: space-between;
  color: #828282;
  font-size: smaller;
}

.timeline {
  width: 80%;
  background-color: #27ae60;
}

input[type="range"] {
  background-color: #27ae60;
}

@media (max-width: 900px) {
  .component {
    width: 50%;
  }
}
Enter fullscreen mode Exit fullscreen mode
Run the react server. If everything goes well you will be able to see the below screen.
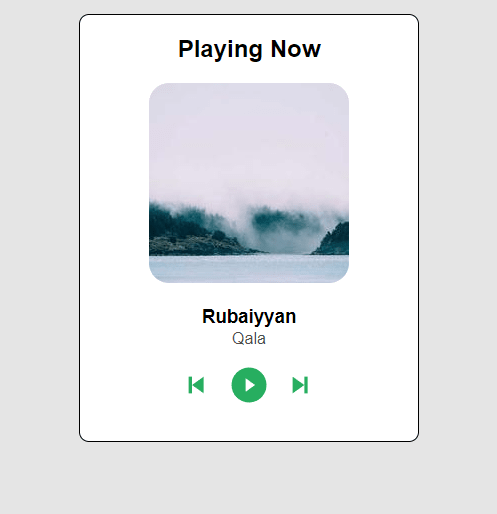
Click on the play button to play the audio.
Adding audio timeline with the current time and duration of the audio
Now, let’s add the timeline to the player. The timeline will controllable by the user. Any changes to it will change the audio’s current position.
Let’s look into the state that we are using. You see the comments for an explanation of each state.
  const [currTime, setCurrTime] = useState({
    min: "",
    sec: "",
  }); // current position of the audio in minutes and seconds

  const [seconds, setSeconds] = useState(); // current position of the audio in seconds
Enter fullscreen mode Exit fullscreen mode
We are grabbing the duration props from the useSound. As the duration is provided in
milliseconds, we have converted it into minutes and seconds.
useEffect(() => {
  const sec = duration / 1000;
  const min = Math.floor(sec / 60);
  const secRemain = Math.floor(sec % 60);
  const time = {
    min: min,
    sec: secRemain
  };
Enter fullscreen mode Exit fullscreen mode
Now, for the current position of the audio, we have the sound.seek([]) method. We are
running this function every second to change the current position of the audio. After getting the position
of the audio which is in seconds. We are converting it into minutes and seconds. After converting, we are
setting the state with the current value. Here is the code for it.
useEffect(() => {
    const interval = setInterval(() => {
      if (sound) {
        setSeconds(sound.seek([])); // setting the seconds state with the current state
        const min = Math.floor(sound.seek([]) / 60);
        const sec = Math.floor(sound.seek([]) % 60);
        setCurrTime({
          min,
          sec,
        });
      }
    }, 1000);
    return () => clearInterval(interval);
  }, [sound]);
Enter fullscreen mode Exit fullscreen mode
Now for the return. Here is the code.
      <div>
        <div className="time">
          <p>
            {currTime.min}:{currTime.sec}
          </p>
          <p>
            {time.min}:{time.sec}
          </p>
        </div>
        <input
          type="range"
          min="0"
          max={duration / 1000}
          default="0"
          value={seconds}
          className="timeline"
          onChange={(e) => {
            sound.seek([e.target.value]);
          }}
        />
      </div>
Enter fullscreen mode Exit fullscreen mode
The value of the range input is the second state. It will provide us with the current
position of the audio. On change in the range by the user. We are calling the soud.seek()
method to change the current position of the audio.
Output
After successfully completing the project, you will be able to see the below output.
GIF
Note: The music is coming into my speaker.
I have created a codesandbox. You can look at it for the complete project with code and the output.
Note: The song that I used is Rubaaiyaan from Qala. All credit to the creator.
Additional Features
You can work on the music player to add more features such as:
- It currently plays one song and loads many songs into it. Use the next and the previous icons for changing audio.
- Change the name and album of the audio as per the song.
- Add more features that you wish a music player should have.
Conclusion
We have created our own music player. This project will help you in handling audio files in React. We have added features of play and pause with the function. Also added an audio timeline with the range input. Users can change the current position of the audio with the timeline. Feel free to add more features to the project.
I hope this project has helped you in understanding a method of handling music in React. Let me know in the comment if you want a video player tutorial too. Thanks for reading the blog post.